Enter your domain name here:

This blog post will be parametrized for your case

Why installing SSL certificate?

SSL certificate is used for encrypting the data transfered between your website and it’s visitors. It encrypts all the data, including passwords, credit cards, files, preventing others from reading them. Nowadays browsers like Google Chrome show security alerts, when such a website has sensitive form data, and is not using SSL encryption. In this tutorial, the Coding Cat will show how to install free Let’s Encrypt SSL certificate for your website, that auto renews on Debian. On other Linux distributions the process is very similar, you can check it here: link.

Let’s Encrypt certificates expire in 90 days, but you can automate renewal, in this article we will show how. There is also a limit: 20 certificates per week. More about the limit: link.

Before installing the certificate make sure you have domain properly installed. If not, check out our tutorials How to install LAMP and How to configure a domain.

Installing certbot

First you need to add jessie-backports to your sources.list:

sudo sh -c 'sudo echo "deb http://ftp.debian.org/debian jessie-backports main" >> /etc/apt/sources.list'

Then update:

sudo apt-get update

Installing certbot for Apache:

sudo apt-get install python-certbot-apache -t jessie-backports

Installing certbot for Nginx:

sudo apt-get install python-certbot-nginx -t jessie-backports

Installing certificate for a domain

For Apache configuration run:

sudo certbot --apache

For Nginx:

sudo certbot --nginx

You should see something like this:

Certbot - choosing domain

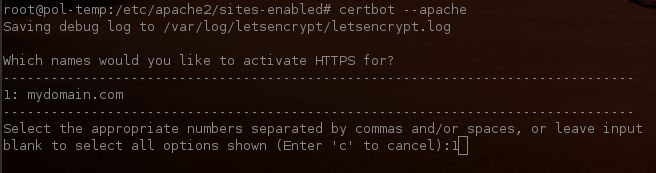
Enter numbers of domains you want to enable HTTPS separated by commas or spaces, like “1 2 3” and press enter.

Then enter your email address, which will receive important notices from Let’s Encrypt about security issues and expiration. Then accept Terms of Service by typing “A” and pressing enter.

∗If you see an error like this (Apache):

Expected </VirtualHost> but saw </VirtualHost></IfModule>

Just add an enter to the end of your VirtualHost configuration file and try again by “sudo certbot –apache” command.

If all went well, you should be able to choose “Easy” or “Secure” mode. In “Easy” mode, all requests are allowed, http and https. With secure mode, all http requests are redirected to secure https. Choose one and press enter.

Next you should see “Congratulations! You have successfully enabled https://{domain}” message

Navigate to your website and check if https works, you can also test on ssllabs.com:

https://www.ssllabs.com/ssltest/analyze.html?d={domain}

Or sslhopper:

https://sslshopper.com/ssl-checker.html#hostname={domain}


Configuring auto renewal

To renew your certificates you can use a command:

sudo certbot renew

If you want to automate that, you need to register it on cron table:
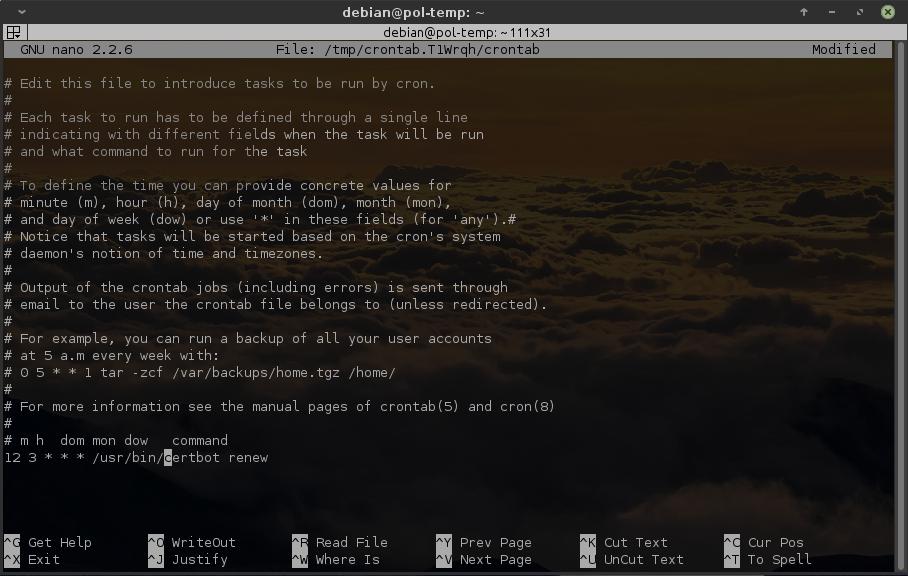
sudo crontab -e

Crontab - choose an editor

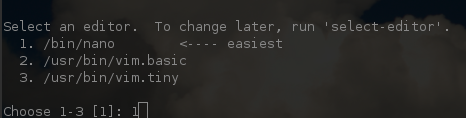
Choose your editor and press enter.

Now, at the bottom, add a line:

12 3 * * * /usr/bin/certbot renew

so it looks like this:

Crontab - edit

Your auto-renewal task will be executed every day at 3:21 AM. Don’t worry, certbot will renew only certificates that are soon to expire.


Enter your domain name here:

This blog post will be parametrized for your case

1. Configuration directory

After you installed LAMP, you are ready to set your application online. To do that, you need to set VirtualHost configuration. Apache2 VirtualHost configuation files are in /etc/apache2/sites-enabled/. A good practice is to put them on /etc/apache2/sites-available/ and then symlink to sites-enabled, so you can remove domains by simply removing symlinks, without deleting the file.

So, go to your sites-available directory:

cd /etc/apache2/sites-available/

2. Create a VirtualHost config file

Create your domain config file, let’s assume, your website files are under /var/www/html/{domain}/

sudo nano {domain}.conf

Then, paste the code:

<VirtualHost *:80>
        ServerAdmin webmaster@localhost
        ServerName {domain}
        ServerAlias *.{domain}
        DocumentRoot /var/www/html/{domain}/
        <Directory />
                Options FollowSymLinks
                AllowOverride None
        </Directory>
        <Directory /var/www/html/{domain}/>
                Options -Indexes
                Options FollowSymLinks MultiViews
                AllowOverride All
                Require all granted
        </Directory>

        ErrorLog ${APACHE_LOG_DIR}/error.log

        LogLevel warn

        CustomLog ${APACHE_LOG_DIR}/access.log combined

</VirtualHost>

Press ctrl+o to save, and ctrl+x to exit.

Then, create a symlink to sites-enabled directory:

sudo ln -s /etc/apache2/sites-available/{domain}.conf /etc/apache2/sites-enabled/{domain}.conf

3. Check configuration and reload

Run this code to test your Apache2. Coding Cat’s advice is to run this code everytime you make changes to Apache configuration. It may save you a lot of trouble.

sudo apachectl configtest

To reload Apache2 without impact of current website visitors, simply run:

sudo service apache2 reload

4. Done! Let’s check if it works

Open your browser, and go to http://{domain}/

If you get DNS errors, check if your domain points at your server:

dig {domain}

If not, you need to configure DNS records at your domain provider.


If you see 404 error, check if you have index file under /var/www/html/{domain}/ directory, like index.html or index.php, and make sure you did not receive any errors at step 3.


If you see other errors or a blank page, check out error.log file:

tail -f /var/log/apache2/error.log


What is LAMP?

LAMP stands for Linux + Apache + Mysql + PHP. In this blog post the Coding Cat will show how to install ready to use LAMP with newest versions: Apache 2.4, Mysql 5.7 and PHP 7.1.

Preparation

If you are on vanilla Debian 8, first update and upgrade:

sudo apt-get update && sudo apt-get upgrade


Install Apache 2.4 on Debian 8

Installing Apache is simple, just run the code:

sudo apt-get install apache2


Install PHP 7.1 on Debian 8

By default PHP on Debian 8 is in lower version than 7.1, so we need to add some addresses to the sources:

sudo apt-get -y install apt-transport-https lsb-release ca-certificates
sudo wget -O /etc/apt/trusted.gpg.d/php.gpg https://packages.sury.org/php/apt.gpg
sudo sh -c 'echo "deb https://packages.sury.org/php/ $(lsb_release -sc) main" > /etc/apt/sources.list.d/php.list'

Next, we can use apt-get to install PHP with modules we want:

sudo apt-get update && sudo apt-get install php7.1 php7.1-cli php7.1-fpm php7.1-apcu php7.1-apcu-bc php7.1-common php7.1-curl php7.1-intl php7.1-json php7.1-mbstring php7.1-mcrypt php7.1-mysql php7.1-opcache php7.1-soap php7.1-xml php7.1-xmlrpc php7.1-xsl php7.1-zip php7.1-gd php7.1-imap php7.1-intl php7.1-zip


Installing Mysql 5.7 on Debian 8

First we need to install libaio1 package

sudo apt-get install libaio1

Then download deb package from mysql website:

sudo wget http://dev.mysql.com/get/mysql-apt-config_0.8.6-1_all.deb
sudo dpkg -i mysql-apt-config_0.8.6-1_all.deb

When you see this screen below, just use arrows to go to this “Ok” and press enter. This is one of the worst UX the Coding Cat have ever seen..

Mysql installation screen


Update and install

sudo apt-get update
sudo apt-get -y install mysql-community-server

Done. Check installed versions.

Now you are all set, check your version of PHP:

php -version

Version of MySQL:

mysql --version

Version of Apache

sudo apache2 -v